
Bottom rigs can be used with live or dead bait to catch fish that are on or near the bottom of the bay or surf. Whereas float and freeline rigs are designed to catch fish in the upper and middle water column, bottom rigs are designed to hold your bait on/near the bottom. Some bottom rigs, when paired with the right sinker, can hold your bait in one spot on the bottom even when there are strong currents or rough/wavy conditions, unlike float/freeline rigs that are pushed around by the waves and current. There are many variations to bottom rigs, but most fall within two basic categories: 1) rigs where the sinker is above the hook, and 2) rigs where the sinker is below the hook. In this article, I’ll discuss some very basic and time-tested bottom rigs that work well and are easy to rig.
Double Drop Rig
The Double Drop rig is a gold standard that has been around forever. It consists of two hook attachment points (called “drops”), situated above a sinker. If you take a look at my example below, there is a swivel on the upper end, then a section of line (blue arrow) between the swivel and the first drop (white arrow “1”), another section of line (red arrow) between the first drop and the second drop (white arrow “2”), and a third section of line between the second drop and the sinker (yellow arrow). This rig can be easily tied with spare fishing line that you have. In my article on knot tying (here), I show how to tie the Dropper Loop for the hooks, and also show a few different knots that can be used for swivels and sinkers, such as the Uni Knot.
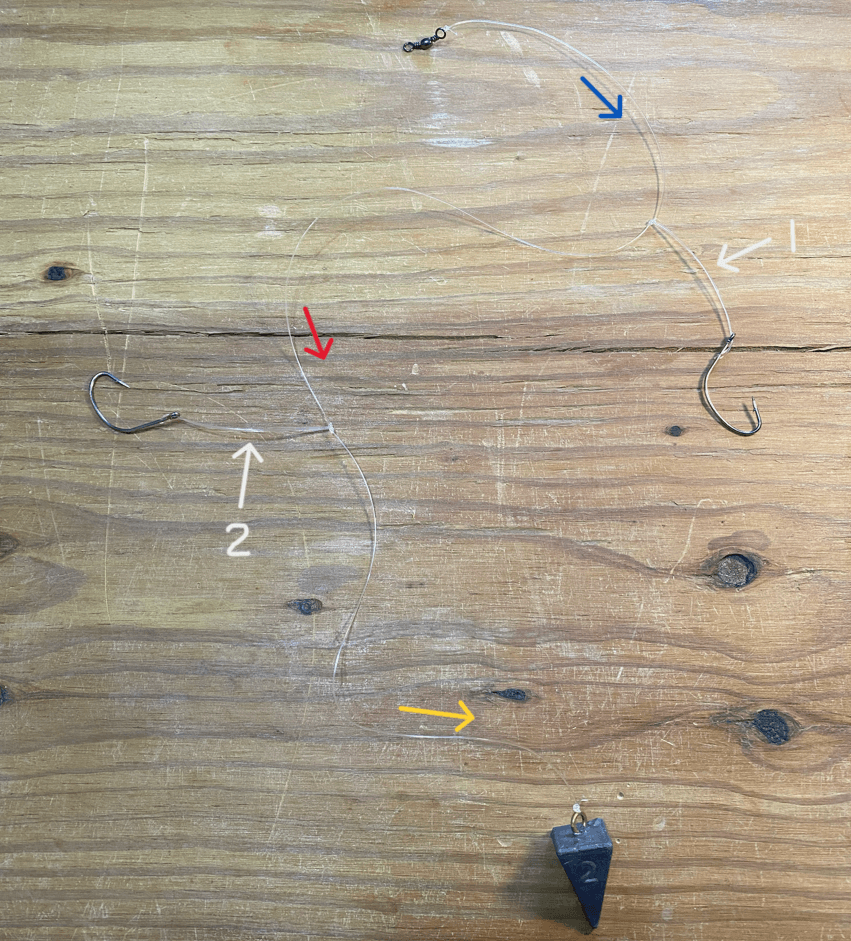
The Double Drop Rig is easy to cast because because the sinker is situated on the bottom of the rig in direct alignment with the hooks/bait, which minimizes drag. After you cast and your rig sinks to the bottom, the sinker will usually stay in place pretty well, and the hook/bait will suspend in the water column several inches, putting the bait at an ideal height above the bottom for roaming fish to see it.
Another advantage of the Double Drop Rig is that you can try two different types of bait at once. For example, you could try dead shrimp + squid, or cut pinfish + cut mullet. This is a convenient way to find out what the fish are feeding on.
Virtually any type of sinker can be used with the Double Drop Rig. Pyramid sinkers, like the one shown in the picture, are a great all-around choice, but teardrop sinkers and round sinkers can work extremely well too. Spider weights can also be used, and may be necessary in strong waves/current. You’ll notice in the picture above that I have tied the sinker to the rig, but if you want to experiment with the weight or style of sinker for a certain fishing situation, simply tie a snap swivel to the bottom of the leader. Then you can change your sinkers out as often as you want to.
In lieu of the Double Drop rig, you can use “Single Drop Rig” or a “Triple Drop Rig”. These rigs are tied exactly the same as the Double Drop Rig, except with the Single Drop Rig, one of the dropper loops is omitted, and with the Triple Drop Rig, a dropper loop is added. I fish with the Single Drop Rig quite often; for example, if I’m using only shrimp for bait and I know there are hungry fish in the area, I won’t bother with a Double Drop Rig and will just use a Single Drop Rig. I rarely use a Triple Drop Rig, but I can see an advantage if you need to try a variety of baits because you don’t know what the fish are feeding on at that moment.
Fish-Finder Rig
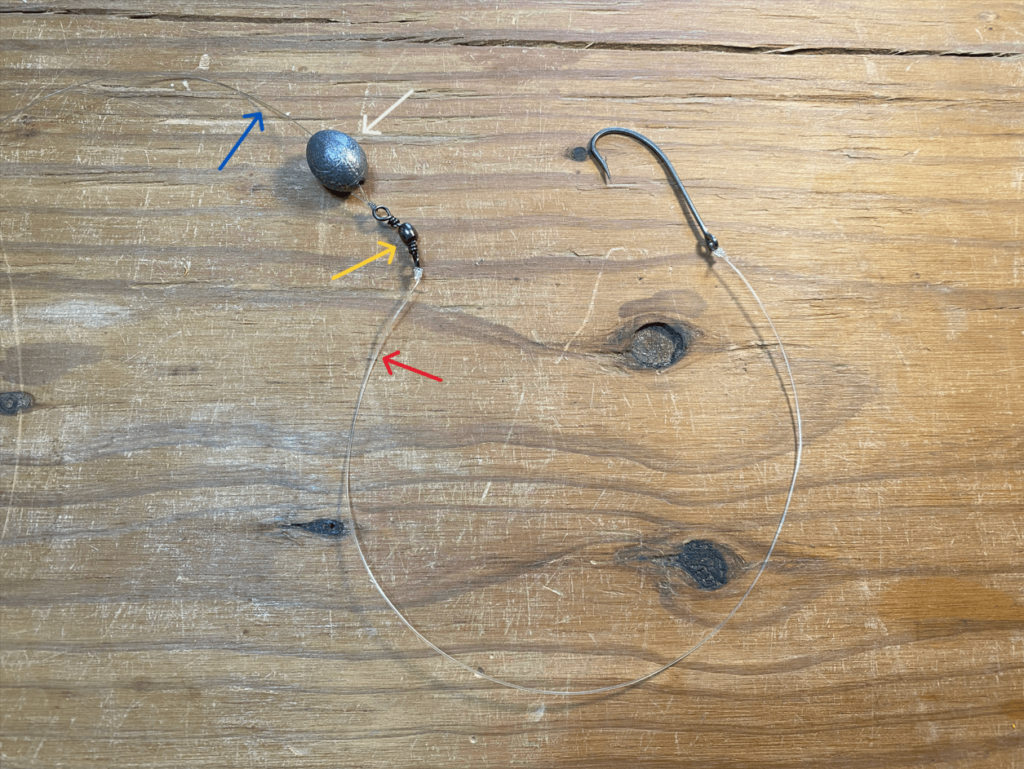
The Fish-Finder Rig is another gold standard that has been around forever; see my example below. In general, it consists of a sliding egg sinker (white arrow) situated on your main line (blue arrow), with some sort of stopper, which is usually a swivel (yellow arrow), and a section of leader tied to the hook (red arrow).
The rig can be easily tied with spare fishing line that you have, and my knot tying article (here) shows knots that you can use to tie line to swivels, hooks, and sinkers.
Here is a variation of the Fish-Finder Rig above, using a pyramid sinker instead of an egg singer. In this variation, the main line (blue arrow) runs through a snap swivel (orange arrow), then through a stopper bead (purple arrow) before tying to the swivel (yellow arrow). A section of leader (red arrow) is used between the swivel and hook, just like the example above.
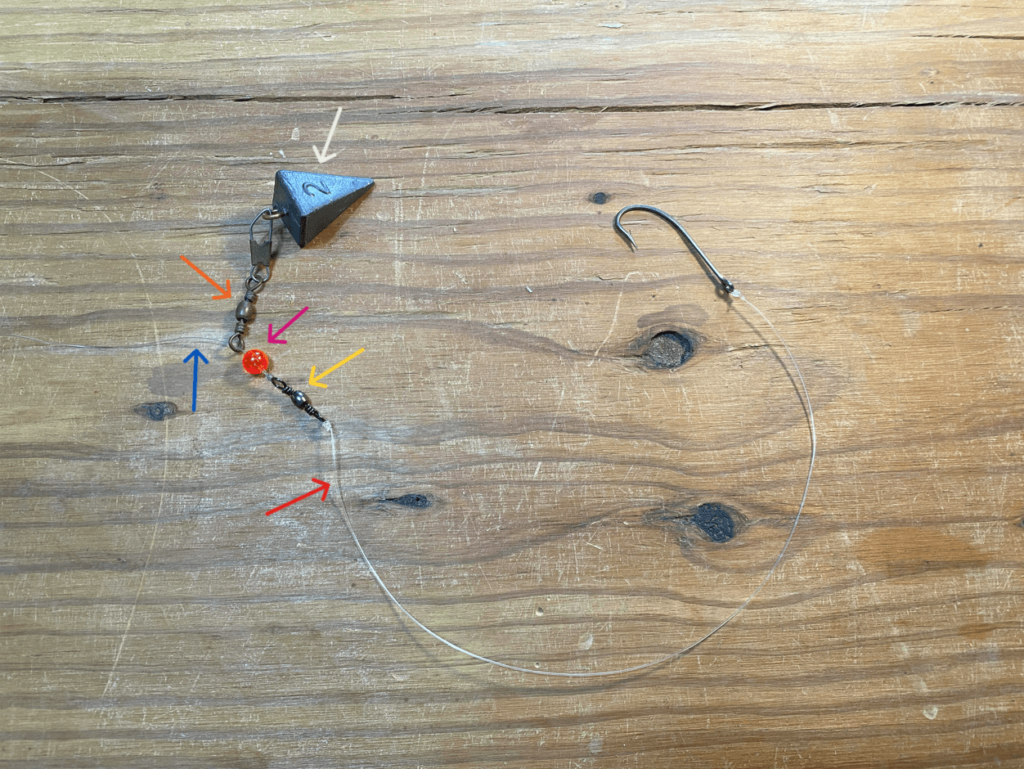
The Fish-Finder Rig is not quite as easy to cast as the Double Drop Rig; since the sinker is located above the hook (instead of below), it is quite a bit less streamlined when flying through the air. However, it has a distinct advantage over the Double Drop Rig. You’ll notice in the first photo above that the main line is able to freely slide through the egg sinker. In the second photo, you’ll notice that the mainline is able to slide through the snap swivel attached to the pyramid sinker. In both cases, this would allow the fish to pick up the bait and start to swim off without ever feeling the weight of the sinker. It is widely believed that this offers a distinct advantage and results in more hooked fish.
Both the Double Drop Rig and the Fish-Finder Rig are excellent rigs to try. I have seen them used many times in many situations, from offshore snapper fishing, to shark fishing, to all types of bay/jetty/surf fishing. I recommend that you try both and see which you like best. You may discover (as I have) that you prefer one or the other based on environment or conditions. Whichever rig you choose, it is typically best to fish it with a “tight line”. In other words, after you cast out and the rig sinks to the bottom, take the slack out of your line until it is taught. This will allow you to detect when you are getting bites.
I prefer tying my own rigs versus buying the clunky store bought variety; 10-15lb monofilament works great for small fish, and 20lb-60lb monofilament works great for keeper sized fish. For larger fish, such as oversized black drum/bull redfish and larger, you will typically fare better with heavier line, but that is a topic for a different article.
Give these bottom rigs a try and catch some fish!
Have a reel good day,
– The Simple Fisherman